
A&P Jacqueline Shipe details the process of changing the oil and filter on an aircraft in this fifth installment in Piper Flyer’s DIY series.
One of the items that is labeled as preventive maintenance by the FAA that a pilot may perform on his or her own airplane is the cleaning or replacing fuel and oil strainers or filter elements.
An oil change performed at a regular interval is one of the best things that can be done to prolong engine life. Clean oil lubricates and carries away harmful deposits better than dirty oil; plus, inspecting the contents of the removed filter or screen often helps to detect a malfunction before it becomes catastrophic.
Draining the oil
Warm oil drains faster than cold oil, so it is nice to run the engine a little before beginning the oil change to cut down on the amount of time it takes to drain. (If you choose to do this, remember that the exhaust components will be especially hot. Use care.)
The first step in the oil change process is draining the old oil. The container the oil is being drained into needs to be large enough to accommodate it. An old five-gallon bucket works well.
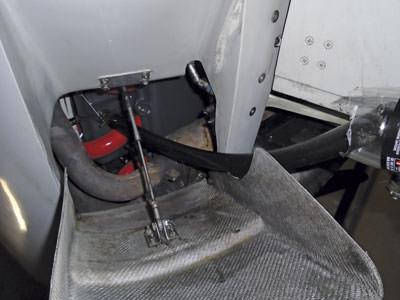
Most planes have a drain valve on the bottom of the sump to facilitate oil changes. There are two primary types of valves: the style that pushes straight up to lock in place, and the type that has to be pushed up and turned.
If it is possible to reach the valve through an opening in the lower cowling, an old rubber hose that fits snugly over the drain end of the valve works great to port the old oil into a bucket and saves having to remove the entire cowling. (It makes a huge mess if the hose pops off the drain valve midstream, so be sure it is secure.)
If the valve is inaccessible, the lower cowling will have to be removed, which isn’t such a bad thing because it allows access to give the engine a good looking-over.
Removing the filter
Filter removal begins with cutting the old safety wire. The wire should be cut in the loop that goes through the safety hole on the engine, never pulled through.
If the wire is pulled, it will cut through the soft, very thin tab on the engine and the tab will then be useless. Once this happens, the safety wire has to be attached at another point on the engine.
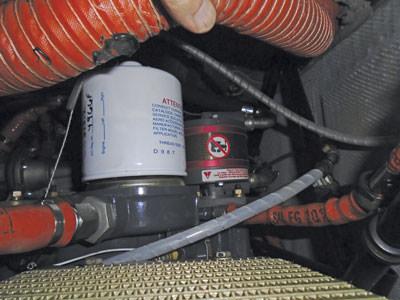
After the safety wire is removed, the filter is loosened by using a one-inch size wrench on the end adapter to remove the filter. It is best if the wrench is the six-point style because the adapters are fairly thin; if the filter is stuck on the engine from being overtightened the time before, a lot of torque will be required to break it loose. The ears on the adapter can be easily rounded off if this happens.
The space between the filter and the other parts on the accessory case is very limited on some engines; a short wrench may be required in these situations.
The filter usually drains a little oil as it is removed. An empty oil container turned sideways with the top cut off can catch any oil that dribbles out as the filter comes off. Once the old filter is off, it can be placed aside and allowed to drain.
Installing the new filter
The new filter needs to be double-checked to be sure it has the correct part number.
Some folks jot the tail number and tach time on the side of the filter using a permanent marker when it’s installed. This helps to determine when the oil was last changed without having to drag out the logbooks. It also ensures that the old filter won’t get mixed up with one that came off another engine or airplane.
The new filter also needs to be inspected to be sure there are no leftover pieces of packaging or debris laying in it. If the filter has any dents or other signs of mishandling, it should be discarded or returned.
After the filter is inspected, the gasket should be lubricated to protect it during installation. Some mechanics also partially fill the filter with clean oil before it is installed to help prevent a dry startup.
Dow Corning DC-4 is the lubricant most filter companies recommend for greasing the gasket on the filter prior to installation. The lube helps with removal the next time, but mainly it keeps the rubber seal from being broken loose from the filter during installation It usually costs around twenty bucks for a tube of this lubricant, and one tube can last for several years.
The oil filter adapters are designed to provide a place to grab the filter with a wrench and are spot-welded on during the manufacturing process. If the new filter is overtightened during installation, one or more of these spot welds may break loose, which can cause a severe leak initially or later on down the road.
Some mechanics never use the wrench adapter to install a filter because of this. At any rate, care should be taken to not over-torque the new filter.
Once the new filter has been installed and properly tightened, it is ready for safety wire. Wherever the new wire is routed, it should be situated so that it can’t chafe into the filter or into anything else. Some mechanics slip a piece of heat shrink or something similar over the new wire to help prevent it from rubbing into the filter.
The wire should have a positive pull on the filter and be fairly taut.
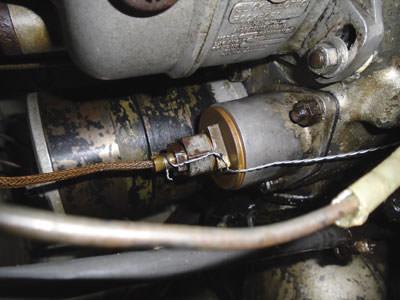
Service the oil screen
Oil screens are removed in a similar fashion as an oil filter. The screen is small (compared to a filter) and generally has a larger area for access. The screen is safety-wired in the same manner as a filter.
A copper crush washer is used as the seal on the oil screen housing, and the crush washer should be replaced at each oil change.
Engines that didn’t originally come with an oil filter as standard equipment and have an aftermarket oil filter kit installed often will have the original screen as part of the oil system.
The oil screen should be regularly removed and cleaned in addition to replacing the filter on these engines because the dirty oil goes through the screen before it reaches the filter. If it’s neglected, the screen can actually become clogged with debris and restrict oil flow to the engine.
Perform a leak check
Changing the oil and filter is fairly straightforward, but there are some precautions to take. The oil pressure at the point where it flows through the filter or screen is very high; a leak in a gasket can quickly lower the oil level if the airplane is flown with a leaking filter or crush washer.
Any time the oil filter is replaced or the oil screen is cleaned, the engine should be run on the ground afterward and then checked for leaks. After the proper oil amount is added, the engine is ready for a ground run and leak check.
Inspecting the oil filter and/or screen
The contents of a removed screen or old filter should always be thoroughly inspected for any metal. A clean white paper towel works well to catch the residue off a screen as it is cleaned. Most mechanics use a solvent or parts cleaner to flush a screen.
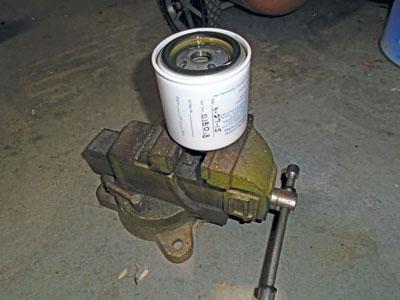
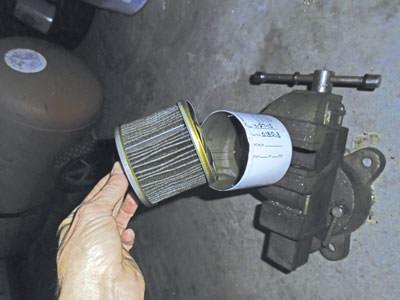
An old filter should be cut open using a filter cutter so the inner part of the filter can be removed. The paper element needs to be completely cut out of the inner metal housing and unfolded so it can be inspected.
When the pleats are still wet with oil it can be hard to see very small particles embedded in the paper. Some folks let the filter drain overnight because of this; the element can be folded sideways and compressed in a vice if a person is in more of a hurry. A vice will squeeze out the old oil but leave any contaminants in the pleats.
A magnet gently drug across the filter pleats or the paper towel will pick up any steel particles. Finding any metal is cause for concern, but finding steel contaminants is a major concern. The source of the steel should be tracked down and remedied if there is more than a trace amount.
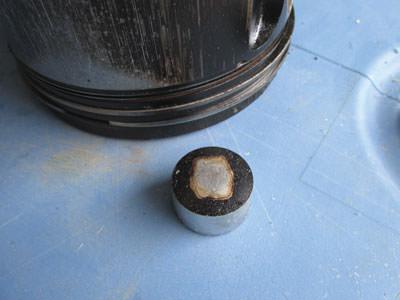
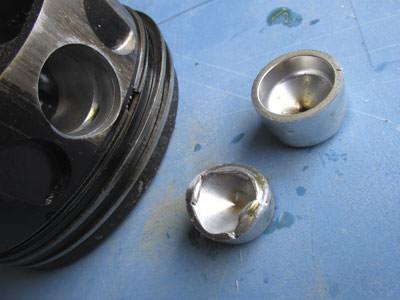
Aluminum flakes or slivers are generally caused by wear on one or more of the piston pin plugs in the cylinders. These plugs are made of aluminum in most engines; some are now made of brass.
They contain the free-floating piston pins on either side and keep them from contacting the cylinder walls. Aluminum and brass are relatively soft compared to steel and are designed to wear without damaging the cylinder wall.
If just a few particles of aluminum or brass are found, it is best to change the oil at an earlier interval next time in order to inspect the filter contents. Generally the problem goes away on its own because the plug wears itself in a little and stops, but not always.
Increasing amounts, or large initial amounts, of any metal is grounds for disassembling the cylinders—and possibly the entire engine—to discover the cause. It is best to let an experienced mechanic inspect oil filter contents if any metal is present to get a second opinion about what action, if any, should be taken.
Regular oil changes will save money in the long run. Owners that change the oil, filter and/or screens themselves will not only save money on labor costs, but also have a good understanding of the health of their airplane engine.

Know your FAR/AIM and check with your mechanic before starting any work. Always get instruction from an A&P prior to attempting preventive maintenance tasks. Jacqueline Shipe grew up in an aviation home; her dad was a flight instructor. She soloed at age 16 and went on to get her CFII and ATP certificate. Shipe also attended Kentucky Tech and obtained an airframe and powerplant license. She has worked as a mechanic for the airlines and on a variety of General Aviation planes. She’s also logged over 5,000 hours of flight instruction time. Send question or comments to editor@www.piperflyer.com.
