
Before you can properly seal the door, you must ensure it is fitting properly. Here is a step-by-step guide for removing, checking and adjusting the door.
The only way to properly adjust a door on a Piper PA-28 series aircraft is with the door seal removed. Only then will you know if the door is fitting properly. The following procedures should be accomplished before installing a new seal, and they can only be done by or under the supervision of an A&P mechanic.
Remove the door
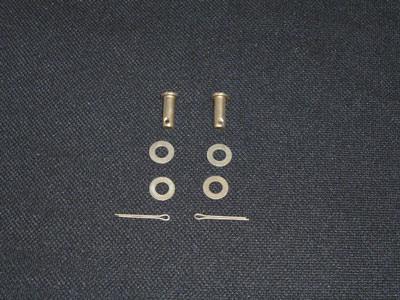
Remove the screw, step bushing and washer attaching the doorstop to the doorsill plate. Remove the cotter pins, clevis pins and washers from door hinges. Set the door aside on a blanket or other protective covering.
Remove the old seal
There is no easy way to remove the old seal and adhesive, but I’ve found that using an electric heat gun (such as those used for paint removal) aids this process considerably. First, locate the seal joint and with the heat gun apply heat to the seal and carefully begin to lift the seal from the edge of the door. Continue applying heat in the apex of the seal as you lift it from the edge of the door until you have it completely separated from the door.
Remove the door seal adhesive
Removing old adhesive can be performed using one of two methods. One way is to use a small (three-inch) brass brush on a drill motor and literally peel the adhesive off the door. This method does require that the door edge be repainted. (An aerosol such as Krylon paint may be used to repaint the edge of the door, and it stands up well over the years.)
The second method is to dissolve the adhesive with a product called Goof Off. Goof Off, touted as “The Miracle Remover,” will not affect paint or Plexiglas.
I’ve found that applying heat to the old adhesive and then wiping the area using a rag saturated with Goof Off will remove the residue. Use caution to prevent combustion. Ensure any Goof Off liquid remaining on the door has fully dried before reapplying heat from the heat gun.
When the door edge is cleaned up, you are ready proceed with the adjustment.
Check for wear in the hinge
Over the years, the eyebolts and clevis pins (door hinge system) can become worn to a point where the door will sag and not close or seal properly. It’s imperative that these parts be checked for wear before proceeding.
A good way to check the parts for wear is to slightly open the door and see if you can raise up on the door. There should be no movement (or very little movement) of the door vertically.
If you can raise up on the door, the eyebolts and clevis pins are worn out and should be replaced. (The tolerance when new is only three thousands of an inch.)
These items are not expensive, yet they are critical to properly closing and sealing the door. Aircraft Door Seals sells eyebolts and clevis pin sets. The new eyebolts and clevis pins come with complete instructions for installation and can be replaced in less than five minutes.
Reinstall the door
Place the door into position over the eyebolts and install the washers and clevis pins in the door hinges. (Do not reconnect doorstop to the doorsill on the fuselage at this time.) Close the door and secure the upper latch.
With the door closed and latched, verify the front edge of the door is flush with the fuselage. Many times the door will not be flush; instead, it will actually be fitting inside of the fuselage anywhere from 1/8 inch to 3/16 inch. It must be flush with the fuselage before you proceed.
If you find the door is not fitting flush, this may be corrected by the installation of spacers (washers) under each eyebolt (or as required) which will move the upper or lower portion of the door and enhance the door’s fit. The washers you’ll need are AN960-516 (thick) and AN960-516L (thin)—typically, just one or two under each eyebolt will correct the fit.
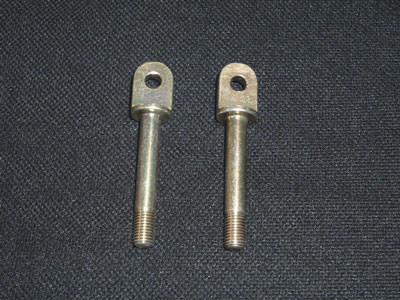
To remove the eyebolt, you must remove the door. Just inside the cabin in front of the door opening (behind the interior trim), you will find a 5/16-24 nut for the upper and lower eyebolt. Slide a half-inch box wrench behind the upholstery, placing it over the nut.
Using a crescent wrench on the eyebolt, unscrew the eyebolt (counterclockwise) and remove it. It is helpful to have an assistant place the washers on the eyebolts so you do not have to move the wrench and nut. Install one or more washers as required on the eyebolt(s) and reinstall. Do not over-tighten—just snug is sufficient.
Reinstall the door and verify the front edge of the door fits flush with the fuselage. If not, repeat this procedure using thick and/or thin spacers until it does fit flush.
Note: Many times the factory installation leaves a little to be desired. With the door fully closed, inspect the clearance between the edge of the door and outer periphery of the fuselage door opening. Many times I have found the edge of the door skin actually hitting the fuselage, especially at the front edge. You should have a minimum of 1/16 inch clearance. If not, file the edge of the door until it has the proper clearance.
Adjust the door
If the door does not fit flush with the fuselage around the entire opening, start with the adjustment of the main latch by loosening the two flat head screws and move the striker plate (in or out) as required. Re-tighten the two screws. Repeat this as necessary until the door fits flush. The door should have a 1/16 inch to 1/8 inch clearance around the entire edge of the door and fuselage.

On early Piper models (pre-1968) I’ve found the latch clevis pin to be bent, which will prevent the door from latching properly. If it is bent, it must be replaced. Aircraft Door Seals stocks this clevis pin.
To provide the proper vertical adjustment of the door, insert the necessary washer combinations between the cabin door hinge(s), clevis pins and the fuselage eyebolts. Also verify that the fittings riveted to the door have not been bent. The fittings forming the portion that fits over the eyebolts should be straight.
Adjust the upper door safety latch
To adjust the door upper (hook) latch, remove the two screws from the latch plate on the top of the fuselage door opening. Remove the plate and rotate the loop clockwise or counterclockwise (a small amount of WD-40 on the threads will help) to make necessary adjustments.
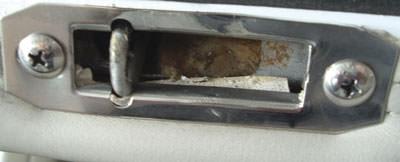
Replace the latch plate and secure with the two attachment screws. Check the fit of the door.
Many times the upper latch hook can become bent and actually hit the upper portion of the door opening (fuselage). The upper hook should be centered in the upper opening. If not, using vise grips, clamp the hook at the point where there is a slight bend in the hook and slightly bend the hook until it is centered in the opening. Caution: When bending the hook, support the hook with your thumb in the area where you are bending. This will prevent the latch from being damaged.

Check the fit and make final adjustments
When the door is properly adjusted, there should be approximately a 1/16 to 1/8 inch gap around the outer periphery of the door between the door edge and the fuselage.
Insert the cotter key(s) in the clevis pins and bend the cotter key ends around the clevis pins and trim off the excess cotter key length as required.
It is not uncommon for the forward top edge of the door to not fit totally flush with the top edge of the fuselage. This condition is due to the variables in the assembly process of the door. Many times I have found it necessary to adjust the fit of this portion of the door by slightly bending the door upper edge.
This procedure will not damage the door and has been done by the factory for years, but it must not be done with the door installed. It is best done with the door lying flat on a blanket and manually massaging the upper portion of the door with your knee until you are satisfied with the fit.
The entry door has been cleaned up, fitted and adjusted, but you’re not done yet. Follow the manufacturer’s instructions to the letter for successful installation of the new door seal.
Dick Russ is a multi-thousand-hour commercial, multi-engine and instrument-rated pilot. He’s also a flight test engineer and an A&P/IA who has restored many Pipers. In addition to his career as a freelance writer and aviation business owner, he was senior engineer on the Shuttle Enterprise Approach and Landing Test Program at Edwards AFB. Russ holds three patents on aviation components. Send questions or comments to editor@www.piperflyer.com.
RESOURCES
