
The pros and cons of using decals and stencils to apply aircraft graphics.
You’ve just repainted your airplane and it’s beautiful. There’s just one detail keeping you grounded: applying the required N-numbers and placards.
According to the dictionary, a placard is a “sign for public display.” So, what’s the best method to publicly display your aircraft information? Decals or paint?
Dried-out decals
I’ve never liked decals, particularly after seeing so many cracked and peeling from airplanes sitting in the sun on the flight line, but they do have some advantages.
First, almost anyone with patience can apply them. If you mess up, peel it off and try again. Another benefit is that they can be easily removed. If there’s a chance you may change your N-number, decals are the way to go.

There’s one caveat, though: the paint around decals can fade, so after a few years it may not look so great if you make a change. (Kind of like a girl with a suntan from one bikini who then wears another with a different cut. You can tell where the sun’s been, and where it hasn’t.)
Unless you have the cash to hire a professional painter, or you’re an artist yourself, you’ll want to use decals for any complex designs. Unusual or personalized images can be sent to an aviation graphics company for printing on decal material.
Soap is for the kitchen dishes
When applying a decal to an airplane, many people suggest using soapy water—often a mixture using common dish soap—to make a slippery surface for the decal to float upon. This allows for fine adjustment of the decal’s position and for air bubbles trapped underneath to be squeezed out.
I don’t think soap is good for adhesion, and I have to wonder if the reason many decals are peeling and cracking is that they’ve been degraded by a sunbaked soap film. If you use my method, you shouldn’t have any bubble problems and you won’t need to make last-second, soapy adjustments to your decal’s position.
My method to apply decals
1. Use a small piece of masking tape to place the decal where you want it, with the backing material against the aircraft. The decal material is made of three layers, a heavy backing, the decal in the middle and a light protective paper. You’ll be able to see through the light paper side to ensure its orientation.
2. Step back and look at the position carefully. Compare what you see in front of you to your photos or design plan. Is the decal straight? Does it match the “line” of your plane? It might look better if it matches the airplane’s lines versus being dead-straight.
3. Adjust the decal until you are absolutely sure that’s where you want it, then completely tape down the top edge.
4. Flip the decal up, making a hinge of the tape. Crease the tape so it moves easily.
5. Have a soft, clean cloth within reach and start peeling the backing off the decal from the top, next to the tape hinge. Press down that topmost edge of the decal and use the cloth to smooth the decal as you slowly peel the backing material off. The cloth will help it go down smoothly without any bubbles. Work slowly, and pull the backing material off in a straight line.
6. When the decal is fully applied, remove the protective paper and masking tape, and rub the decal gently with the cloth.
A second pair of hands helps during any decal application, and is essential for large decals—one person pulls off the backing, while the other smoothes the decal.
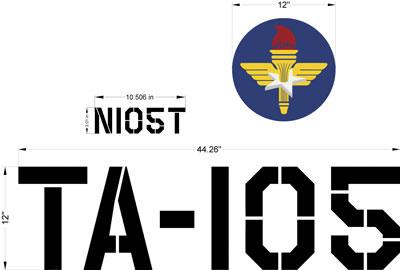
For really large decals—such as 12-inch N-numbers, which could be five or six feet long—it’s best to cut the decal into manageable pieces. After taping down the top edge (step three, above), cut vertically between the numbers. The decal will look like a row of teeth. Then apply one number at a time.
Placarded information
Aviation graphics companies sell sets of decals for all the placarded information needed inside and outside your particular aircraft, such as “No Step,” “Avgas Only” and “Fasten Seat Belts.” Do I really need a “No Smoking” decal on my instrument panel? Evidently, it’s required.
Use the same tape-hinge method described earlier for these small decals.
Stencils and paint
Painted graphics look better, especially after years under the sun, but painting also takes far more effort (or money, if you want someone else to make the effort).
First, you must apply stencils and protect nearby areas of the aircraft from overspray, then mix up and spray toxic paints, remove the stencils and protective materials, and clean the spray equipment. The stencils, paint and rental of a spray gun cost far more than decals.
Painted markings are also almost impossible to change—you’d have to repaint the background color first—so be sure before you start spraying.
If it’s so much effort, why paint?
It looks really good and stands up to the elements when done right.
Large stencils can cost hundreds of dollars—quite a bit more than masking tape—but modern stencil materials give a much sharper edge and don’t allow paint to bleed underneath.
I think it’s worth the cost. This is especially true when painting on fabric covered aircraft with ribs and stitches to cover. The difference between figures sprayed through computer-cut stencils and those done using masking tape is obvious, at least to me.
Some painters still prefer to use tape to mask out N-numbers and insignias for painting, citing the cost and difficulty of handling large stencils. But, in my opinion, that’s a tradeoff of quality for cost. You have to be a real artist to create straight, properly aligned letters with a roll of masking tape, and there’s inevitably a few spots where the paint bleeds.
If you do use masking tape, run your thumbnail over the edges to make sure they are pressed down completely. And, no matter how well you think the tape is adhering, paint will bleed under it every time if you apply the paint too heavily at first. A very light, almost dry coat will seal the edges and prevent bleeding when you apply a heavy coat to finish the job.
My method for applying stencils is the same as it is for decals. The only difference is the additional step of removing the middle layer—the one cut in the shape you want to paint—so the paint can reach the surface.
Really large stencils might take three people to apply: two to pull off the backing material and one to smooth the stencil.
Take a second look
I ordered two identical stencils for my aircraft. You would think the company would set up the type (in this case, a large N-number), hit “print 2,” and they’d be spit from the stencil-cutting machine exactly alike. Well, they weren’t.
The painter placed the stencils on my aircraft according to my instructions and sprayed. Only after he peeled them off did we see that the spacing of the letters was incorrect on one. The letters were too close together.
My pilot friends say, “no one will ever notice,” and maybe that’s true—but I noticed it immediately. I could have fixed it by increasing the spacing myself, if only I’d seen it earlier. The lesson here is: stand back and take a long look before slinging paint.
I’m sure there are decal people, stencil people, masking tape people… and everyone has their own opinion. You can make your own choice. That’s part of the fun of having your own plane, isn’t it?
What methods have you found work best on your airplane? Visit the forums at www.piperflyer.com to share your successes, upload your photos, and get more ideas.
Dennis K. Johnson is a writer and a New York City-based travel photographer. He flies sailplanes whenever possible and is the owner of N105T, a newly restored Piper Super Cub Special. Send questions or comments to editor@www.piperflyer.com.
